Run Routing Information Protocol on JunOS 12.1 in GNS3:
How to Configure RIP on Juniper in GNS3 1.1
In this article i will show you how to run the RIP (Routing Information Protocol) among juniper routers. when you configure the RIP on junos by default it will enable RIP v2 & this is one of the difference from Cisco where you need to configure version2 manually.
I have simulated this lab on gns3 which is one famous network simulator. For juniper simulation i have used junos olive only for study purpose and junos olive is not suitable for any type of commercial use. Gns3 Labs detail are as mention below but you can use any versions of these software.
Gns3 version= Gns3 1.1
Junos version= JunOS Olive 12.1 VM image
VM VirtualBox version= 4.2.4
If you want learn more about the configuration of junos in gns3 you can visit how to configure junos on gns3.

Lab Requirements:
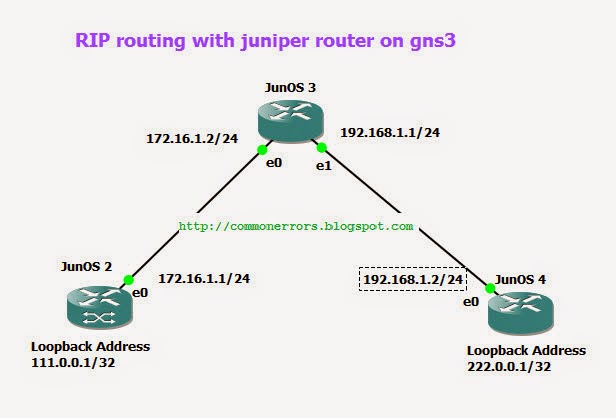
There are three Junos routers in given topology which are connected with each other and already configured with correct IP addresses according to topology. If you want to explore how to configure IP addresses to JunOS interfaces you can visit IP & static routing on JunOS. We have the following task for this Gns3 Lab:
- Configure RIP routing protocol on all these routers
Explanation:
Configuration of RIP on junOS is very simple, you need only few commands and then good to go..:).
By default JunOS don't advertise RIP routes & the routes received from neighbors, so we need to define a routing policy for advertisement of RIP routes.
Configuration of RIP on JunOS2:
You can start configuring JunOS2 in following way.
login: root
root@% Cli
root > configure
[edit]
root # set protocols rip group rip-routes neighbor em0
where rip-routes is the group name, which you can set it of own choice and em0 is the connected interface of Junos2.
root #set policy-options policy-statement advertise-RIProutes from protocol direct
root #set policy-options policy-statement advertise-RIProutes from protocol rip
root #set policy-options policy-statement advertise-RIProutes then accept
Where "advertise-RIProutes" is the name of policy. now you need to apply this policy with following command.
root # set protocols rip group rip-routes export advertise-RIProutes
root # commit
RIP Configuration on JunOS3:
root
Cli
configure
set protocols rip group rip-routes neighbor em0
set protocols rip group rip-routes neighbor em1
Set policy-options policy-statement advertise-RIProutes from protocol direct
set policy-options policy-statement advertise-RIProutes from protocol rip
set policy-options policy-statement advertise-RIProutes then accept
set protocols rip group rip-routes export advertise-RIProutes
RIP Configuration on JunOS4:
root
Cli
configure
set protocols rip group rip-routes neighbor em0
Set policy-options policy-statement advertise-RIProutes from protocol direct
set policy-options policy-statement advertise-RIProutes from protocol rip
set policy-options policy-statement advertise-RIProutes then accept
set protocols rip group rip-routes export advertise-RIProutes
How to verify configuration:
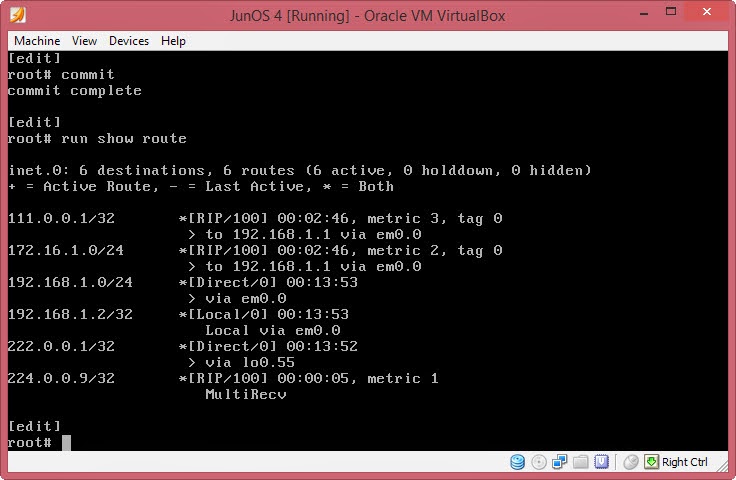
You can test your configuration by ping from junos2 to 222.0.0.1 which is a loopback address on junos4. Also "show route" will show all routes on all routers. An output of show route command will have the following routes:

Comments
Post a Comment