In this tutorial you'll learn how to create an intertwining trellis design from scratch using grid layouts and lining up a narrow, rotated rectangle according to said grid layout. It's a basic, classic pattern that's easy to achieve if you break the shapes down to a simple, repeatable section.
1. Setting Up the Grid Layout
Step 1
The measurements in this tutorial are fairly precise. I worked everything out in a document sized 140 pixels by 193 pixels at a resolution of 72 dpi. For larger designs or a print-ready version versus a web-ready version, you'll have to work out the size conversion on your own. Create a New Document according to the specifications below and let's create our grid!
Step 2
Go to View > New Guide Layout, select both Columns and Rows, and enter 2 for Number of each. Hit OK and move on to the next step.
Step 3
The second Guide Layout involves the option for setting up lines according to a margin. Enter 27 px for each section and hit OK.
Step 4
The final set of grid lines are defined by the following margin settings:
Top: 60 px
Left: 42 px
Bottom: 60 px
Right: 44 px
Step 5
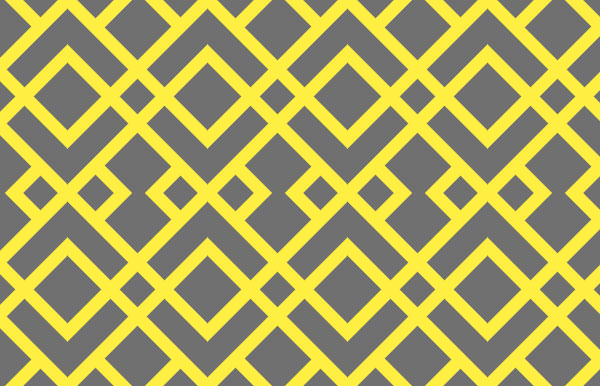
See below for the final grid layout. There are 7 Column Lines and 7 Row Lines in total. Lock Guides (Alt-Control-;) and use the Paint Bucket Tool (G) to fill in your document's background layer with gray (#707070) or the color of your choice.
2. Creating the Pattern
Step 1
Use the Rectangle Tool (U) to draw a long, narrow rectangle measuring 262 px by 13 px. Set the fill color to yellow (#ffef42) or the color of your choice. Make sure the Rectangle Tool is set to Shape in the Options bar.
Step 2
Select your rectangle shape and go to Edit > Transform > Rotate and Rotate the shape 45°. Use the Move Tool(V) to align the edge of your rectangle with the intersection of the fourth column line and the third row line. In the Layers panel, right-click and Duplicate the rectangle shape layer. Go to Edit > Transform > Flip Horizontal. Align the flipped rectangle with the same intersection as before. Note how the two rectangles form an "X" that is aligned to the center column line.
Step 3
Once again, Duplicate your rectangle shapes. This time, align them with the fourth column line and the fifth row line. Note how the third and fifth column lines align with the intersections of your rectangle shapes.
Step 4
Duplicate the diagonal rectangle shape again (make sure this one goes from the top left to the bottom right) and align it in the top right of the document. Note the arrows pointing to the intersection points of the second row line and the sixth column line. Repeat for the left side (making sure the diagonal rectangle goes from the top right to the bottom left) aligning the intersections with the second column line and the second row line. It helps, when lining up your shapes, to nudge selected rectangle layers around with the arrow keys, especially when aiming to be precise.
Step 5
Finally, repeat the smaller lines at the bottom of the design. Align the right diagonal rectangle with the sixth column line and sixth row line. Align the left diagonal rectangle with the second column line and the sixth row line.
Advertisement
Step 6
Under View, deselect Extras (Control-H) and go to Edit > Define Pattern. Give your new pattern a name. Create a New Document of 800 pixels by 600 pixels and use the Paint Bucket Tool to test it out. If the pattern is not seamless or the rectangles were misaligned in any way, toggle Extras on again and move individual diagonal rectangles as needed. It took quite a bit of trial and error to make sure my grid lines and rectangles were aligned perfectly before writing this tutorial up, so you should have a perfectly seamless design if you aligned your rectangles to the grid layouts created at the start of this tutorial.
Well Done, You've Got a New Pattern!
I hope you enjoyed creating your new, seamless geometric pattern. Share your version, including changes in colors and shapes, of the pattern in the comment section below! For more geometric pattern tutorials, check out the following:
I'm going to discuss how I like to implement a rope-swinging gameplay mechanic. When I started working on Energy Hook I mostly did everything with my own custom code. I believe it's possible to simply go into Unity and use the Configurable Joint to do some very similar stuff, but at the time it wasn't available. I'm pretty sure this has been the right call, anyway, because it gives me control over everything - and I can share it with you. The fundamentals of doing swinging the way I did - using constraints - are actually quite simple. (Hope you're not disappointed when you see what's under the hood.) It works the same whether you're making a 2D game or 3D game, it's just that the vectors are different, so I'll start off with 2D and then discuss some wrinkles when going to three dimensions. This article also assumes you're using a game engine like Unity that can do a lot of the work for you, like raycasting against geometry and orienting a chara...
In this tutorial, we are going to design a set of icons in Adobe Photoshop. An icon set needs to have the same background and theme. For learning purposes, we are going to design a sun icon, an ice flake icon, and an RSS icon. Let's get started. 1. Preparing the Canvas Step 1 Start by making a new file with size 350 px × 350 px . Click the small box next to the Background Contents option to change the new canvas color. Step 2 In the Color Picker dialog box, select grey ( #e0e0e2 ) for the canvas background color. Step 3 It is always a good idea to keep your work structured from the start. Make a new layer group and name it sun . This is where we will place all layers used in the sun icon. 2. Designing the Icon Base Step 1 Use the Rounded Rectangle Tool to draw a rectangle with size 83 px × 64 px and 8 px radius. To get accurate results, use the Properties panel. In this panel, you can simply enter the exact siz...
1. Creating Wire Structure Step 1 Open 3ds Max . Go to Create panel > Cylinder and draw a cylindrical shape in the Perspective viewport. Creating a Cylinder Step 2 Click on the Modifier panel and then set the Radius to 4 , Height to 500 , Height Segments to 30 , and Sides to 20 . Modifying the Parameters Step 3 With pressing Shift key, make an instanced copy of the cylinder. An instanced copy of the object follows each and every change made to the original one. Cloning the Cylinder Step 4 With both cylindrical objects selected, apply a Twist modifier onto them. Applying the Twist Modifier Step 5 Change the value of Angle to 1000 and Twist Axis to Y axis. You will see the cylindrical shapes get wrapped on each other. Changing the Parameters of the Twist Modifier 2. Creating Knots Step 1 To...


Comments
Post a Comment